《Spring实战》阅读笔记
Spring 的主要目的:简化开发。
两大特点:
- 依赖注入(DI)。实现松耦合。
- 面向切面编程(AOP)。通过声明式地调用组件化的功能模块,来减少样板代码。
DI(依赖注入)
定义bean
一个应用一般有多个类组成,这些类之间相互依赖,假设有A、B两个类,传统的做法,直接在A中需要用到B的地方 new B() ,这样耦合度比较高。
如以下代码所示,在 DamselRescuingKnight 类中依赖RescueDamselQuest。
public class DamselRescuingKnight implements Knight {

    private RescueDamselQuest quest;

    public DamselRescuingKnight() {
        this.quest = new RescueDamselQuest();
    }

    public void embarkOnQuest() {
        quest.embark();
    }
}
这样的话,加入想修改DamselRescuingKnight依赖的类,就必须修改 DamselRescuingKnight 文件。
通过DI的话,对象的依赖关系将由系统中负责协调各对象的第三方组件在创建对象的时候设定。对象无需自行创建或管理依赖关系。
如下代码,则是通过依赖注入的方式之一: 构造器注入 的方式。相对上面更加灵活,只要注入的类实现了Quest接口即可。
public class BraveKnight implements Knight {

    private Quest quest;

    public BraveKnight(Quest quest) {
        this.quest = quest;
    }

    public void embarkOnQuest() {
        quest.embark();
    }
}
接下里,假设有一个已经实现 Quest 接口的类:
public class SlayDragonQuest implements Quest {

    private PrintStream stream;

    public SlayDragonQuest(PrintStream stream) {
        this.stream = stream;
    }

    public void embark() {
        stream.println("Embarking on quest to slay the dragon!");
    }
}
定义config
那么该如何将上面的两个依赖的类组装起来?
创建应用组件间协作的行为通常称为装配(wiring)。Spring 有多重装配方式,以XML为例:
<?xml version="1.0" encoding="UTF-8"?>
<beans xmlns="http://www.springframework.org/schema/beans"
       xmlns:xsi="http://www.w3.org/2001/XMLSchema-instance"
       xsi:schemaLocation="http://www.springframework.org/schema/beans
      http://www.springframework.org/schema/beans/spring-beans.xsd">

    <bean id="knight" class="sia.knights.BraveKnight">
        <constructor-arg ref="quest"/>
    </bean>

    <bean id="quest" class="sia.knights.SlayDragonQuest">
        <constructor-arg value="#{T(System).out}"/>
    </bean>
</beans>
<!--src/main/resources/META-INF/spring/knight.xml-->
如上 xml文件,将 BraveKnight 和 SlayDragonQuest都声明为一个bean,也就是一个Spring 可管理的应用组件。
还可以用基于java的配置:
@Configuration
public class KnightConfig {

    @Bean
    public Knight knight() {
        return new BraveKnight(quest());
    }

    @Bean
    public Quest quest() {
        return new SlayDragonQuest(System.out);
    }
}
通过修改上面的配置文件,我们可以修改 BraveKnight 依赖的类型,即修改依赖关系,但是不需要修改 BraveKnight。
启动应用
Spring 通过 应用上下文 装载bean的定义,并组装bean。应用上下文全权负责对象的创建和组装。
Spring 有多种应用上下文的实现,区别在于如何加载配置。
以 ClassPathXmlApplicationContext 为例:
public class KnightMain {
    public static void main(String[] args) throws Exception {
        ClassPathXmlApplicationContext context =
                new ClassPathXmlApplicationContext("META-INF/spring/knight.xml");
        Knight knight = context.getBean(Knight.class);
        knight.embarkOnQuest();
        context.close();
    }
}
AOP(面向切面编程)
功能组件化。
组件化怎么实现?
- 将多个地方都会调用的代码抽象为一个独立的模块,其他模块调用方法,但是这样,方法的调用还是会出现在各个模块。
- 通过AOP,则可以 以 声明式的方式 调用,实现了功能的模块化,同时减少代码的侵入性。
现在我们想给上面的 embarkOnQuest方法调用前后加上log。
public class Log {

    private PrintStream stream;

    public Log(PrintStream stream) {
        this.stream = stream;
    }

    public void beforeQuest() {
        stream.println("beforeQuest");
    }

    public void afterQuest() {
        stream.println("afterQuest");
    }
}
那么可以修改BraveKnight 为如下:
public class BraveKnight implements Knight {

    private Quest quest;
    private Log log;

    public BraveKnight(Quest quest, Log log) {
        this.quest = quest;
        this.log = log;
    }

    public void embarkOnQuest() {
        log.beforeQuest();
        quest.embark();
        log.afterQuest();
    }
}
META-INF/spring/knight.xml 配置文件需要加入Log。
<bean id="knight" class="sia.knights.BraveKnight">
    <constructor-arg ref="quest"/>
    <constructor-arg ref="log"/>
</bean>
<bean id="log" class="sia.knights.Log">
    <constructor-arg value="#{T(System).out}" />
</bean>
这样就可以达成目的。
但是代码的侵入性太高了,而且embarkOnQuest 方法会变得难以维护。
所以我们可以把 Log 抽象为一个 切面。这样就完全不需要修改BraveKnight。
配置文件中加入切面配置
<aop:config>
    <aop:aspect ref="log">
        <aop:pointcut id="embark" expression="execution(* *.embarkOnQuest(..))"/>
        <aop:before pointcut-ref="embark" method="beforeQuest"/>
        <aop:after pointcut-ref="embark" method="afterQuest"/>
    </aop:aspect>
</aop:config>
-
aop:pointcut 定义切点。
-
aop:before 定义前置通知
-
aop:after定义后置通知
运行的时候发现报错: Error creating bean with name 'knight' defined in class path resource
解决:因为用了AOP,pom.xml需要引入响应的包。
<dependency>
    <groupId>org.springframework</groupId>
    <artifactId>spring-aop</artifactId>
    <version>${org.springframework.version}</version>
</dependency>
<dependency>
    <groupId>org.aspectj</groupId>
    <artifactId>aspectjweaver</artifactId>
    <version>1.9.1</version>
</dependency>
最终 spring配置文件如下:
src/main/resources/META-INF/spring/knight.xml
<?xml version="1.0" encoding="UTF-8"?>
<beans xmlns="http://www.springframework.org/schema/beans"
       xmlns:xsi="http://www.w3.org/2001/XMLSchema-instance" xmlns:aop="http://www.springframework.org/schema/aop"
       xsi:schemaLocation="http://www.springframework.org/schema/beans
      http://www.springframework.org/schema/beans/spring-beans.xsd http://www.springframework.org/schema/aop http://www.springframework.org/schema/aop/spring-aop.xsd">

    <bean id="knight" class="sia.knights.BraveKnight">
        <constructor-arg ref="quest"/>
    </bean>

    <bean id="quest" class="sia.knights.SlayDragonQuest">
        <constructor-arg value="#{T(System).out}"/>
    </bean>

    <bean id="log" class="sia.knights.Log">
        <constructor-arg value="#{T(System).out}" />
    </bean>

    <aop:config>
        <aop:aspect ref="log">
            <aop:pointcut id="embark" expression="execution(* *.embarkOnQuest(..))"/>
            <aop:before pointcut-ref="embark" method="beforeQuest"/>
            <aop:after pointcut-ref="embark" method="afterQuest"/>
        </aop:aspect>
    </aop:config>
</beans>
pom.xml 配置文件如下:
<?xml version="1.0" encoding="UTF-8"?>
<project xmlns="http://maven.apache.org/POM/4.0.0"
         xmlns:xsi="http://www.w3.org/2001/XMLSchema-instance"
         xsi:schemaLocation="http://maven.apache.org/POM/4.0.0 http://maven.apache.org/xsd/maven-4.0.0.xsd">
    <modelVersion>4.0.0</modelVersion>

    <groupId>spring</groupId>
    <artifactId>action</artifactId>
    <version>1.0-SNAPSHOT</version>

    <properties>
        <org.springframework.version>5.0.8.RELEASE</org.springframework.version>
    </properties>

    <dependencies>
        <!-- Spring framework -->
        <dependency>
            <groupId>org.springframework</groupId>
            <artifactId>spring-core</artifactId>
            <version>${org.springframework.version}</version>
        </dependency>
        <dependency>
            <groupId>org.springframework</groupId>
            <artifactId>spring-context</artifactId>
            <version>${org.springframework.version}</version>
        </dependency>
        <dependency>
            <groupId>org.springframework</groupId>
            <artifactId>spring-web</artifactId>
            <version>${org.springframework.version}</version>
        </dependency>
        <dependency>
            <groupId>org.springframework</groupId>
            <artifactId>spring-webmvc</artifactId>
            <version>${org.springframework.version}</version>
        </dependency>

        <dependency>
            <groupId>org.springframework</groupId>
            <artifactId>spring-aop</artifactId>
            <version>${org.springframework.version}</version>
        </dependency>
        <dependency>
            <groupId>org.aspectj</groupId>
            <artifactId>aspectjweaver</artifactId>
            <version>1.9.1</version>
        </dependency>

    </dependencies>
</project>
Spring容器
使用上下文
容器是Spring框架的核心。Spring 容器使用DI管理构成应用的组件,创建组件之间的关联。
Spring的容器有多个实现,主要有两种:
- bean工厂,最简单的容器,提供基本的DI支持。(beanFactory接口)
- 应用上下文(ApplicationContext接口),基于beanFactory。提供应用框架级别的服务,如解析属性文件等。常用应用上下文:
- AnnotationConfigApplicationContext:从基于java的配置类加载Spring应用上下文。
- AnnotationConfigWebApplicationContext:加载Spring Web上下文。
- ClassPathXmlApplicationContext:从类路径下的XML配置文件加载上下文。
- FileSystemXmlApplicationContext:从文件系统下的XML配置文件加载上下文。
- XmlWebApplicationContext:从Web应用下的XML配置文件加载上下文。
类图如下:

// 在指定的文件系统路径查找xml
ApplicationContext context = new FileSystemXmlApplicationContext("C:/knight.xml");

// 在所有的类路径查找。什么是类路径?
ApplicationContext context = new ClassPathXmlApplicationContext("knight.xml");

// 从java配置加载
ApplicationContext context = new AnnotationConfigApplicationContext("com.springinaction.knights.config.knightConfig.class");
准备好应用上下文,就可以调用上下文的getBean() 方法从容器中获取bean.
bean生命周期
传统的应用,bean不在使用后,由java自动进行垃圾回收。
有点复杂。后续熟悉点了再补充。
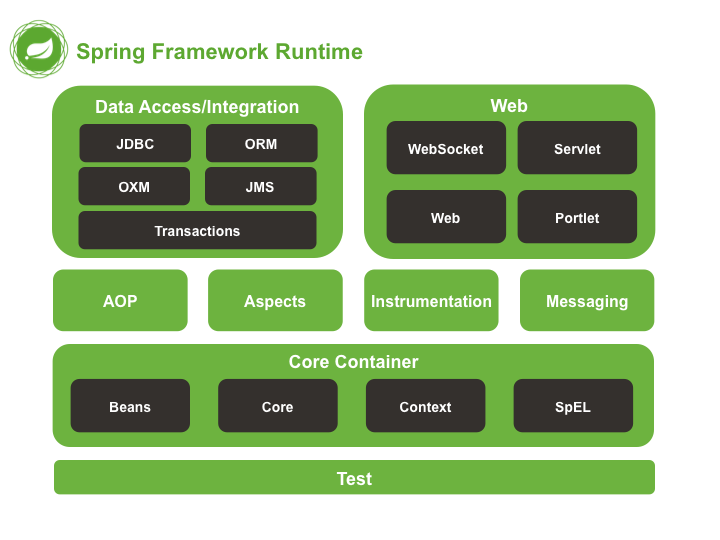
Spring 组成

(图片来源:https://docs.spring.io/spring/docs/4.0.x/spring-framework-reference/html/overview.html)
Spring boot
Spring 简化对了编程,Spring boot则致力于简化Spring本身。
通过自动配置技术,消除大部分Spring配置。